This post is oriented towards usage on a Raspberry Pi, but with slight modification these steps could easily work on any Debian, Ubuntu or UNIX system.
After a couple of years trying to understand the Pi, Nginx and most importantly: networking; I've now found a very nice approach to providing simple HTTPS secure connections for a plethora of sites and effectively proxying non-secure endpoints to their own domain. This post goes into detail on how to set this up in the simplest way I could think of.
Some prerequisites for this post:
Any Raspberry Pi running latest Raspbian Stretch
An up to date package repository (apt update && apt upgrade)
A network connection (I prefer wired connection for fastest possible network-flow)
A note on responsibility
When I was still wrapping my head around the underlying working method of Nginx I've made the error of running it along with all the other services I wanted secured & available. All on the same host (a Raspberry Pi B+ or 3). While the system worked in some way and Nginx should be faster than Apache, I continually ran into problems with memory & cpu delegation between Nginx and other stuff running on even a Pi 3.
So I decided to take the single responsibility approach & adapt to the way how for example, containerization works. Have a Pi which just acts as the proxying server, no other (big) services running on the host and in effect just being a client ↔ proxy ↔ server gateway so to speak. I was amazed to see that there was almost no loss in network request/response between different hosts, and a huge boost in performance on the different Pi's.
The setup
As an example let's take a very popular approach of having an Nginx reverse proxy in front off a Homeassistant application. In this case we have:
A Pi 3 running only Homeassistant (Hass.io)
A Pi B+ running only Nginx (latest)
All hosts connected on the same local network, with only the Nginx host being exposed to the internet
Note that by only exposing and opening up ports on the Nginx Pi it should theoretically minimize some of the risks you open yourself up to when exposing each host. It also makes managing and troubleshooting easier.
Installing Nginx
Start off by installing the latest available version of nginx from apt:
(This release has been updated when Stretch was released and still misses some features that the source Nginx and upstream branch has, but it suffices for most use cases.)
consoleapt install nginx
This should auto-create a systemd unit which can be stopped before we start working with sudo systemctl stop nginx. Navigate to the nginx directory at /etc/nginx/ and unlink & remove the default site with sudo unlink /etc/nginx/sites-enabled/default && sudo rm /etc/nginx/sites-available/default.
Create a new virtual host and link it so that we have that available and nginx can look at request for the domain:
bashsudo touch /etc/nginx/sites-available/homeassistantsudo ln -s /etc/nginx/sites-available/homeassistant /etc/nginx/sites-enabled/homeassistant
Paste the following contents into /etc/nginx/sites-available/homeassistant to have a very simple reverse proxy configuration for this host on its default listening port:
nginxserver {listen 80;listen [::]:80;server_name publicdomain.com;error_log /var/log/nginx/publicdomain.com.log;location / {proxy_pass http://hassio.local:8123/;proxy_set_header Host $host;}location /api/websocket {proxy_pass http://hassio.local:8123/api/websocket;proxy_set_header Host $host;proxy_http_version 1.1;proxy_set_header Upgrade $http_upgrade;proxy_set_header Connection "upgrade";}}
Let's break this configuration down here:
We define this vhost to listen on port 80 on both IPv4 and IPv6 and look at all requests originating from publicdomain.com
A dedicated logging file is being used for this domain at
/var/log/nginx/publicdomain.com.logThe host is set up to proxy requests from the index location to our Homeassistant host on the other end in the
location / {…}blockWe also need to set up the requests to
location /api/websocket {…}so requests to the Homeassistant Websocket are ending up where they need to.Headers are set for upgrade-insecure-requests & connection along with us specifying that the requests should only use HTTP1.1
If you would take a look at
/etc/nginx/sites-enabled/homeassistantafter saving this file, you would note that it's changes are auto reflected from the file at sites-available because of the symlink we created earlier withln -s
Before starting Nginx it's always a good idea to see if the configuration and changes we made are still valid with sudo nginx -t. If that check passes we can start or restart the systemd unit for Nginx with sudo systemctl (re)start nginx.
Navigate to http://publicdomain.com and you should see the interface for our proxied Homeassistant application. Note that you might need to open up a port on your modem, router, firewall for the proxy to be available. Plain HTTP requests typically run on port 80, as we defined in our listen 80; directive. You could of course change this to any port you like.
Securing our requests
One of the great advantages of using Nginx is it's effectiveness towards being an SSL termination proxy. This simple means that Nginx can act as the secure line between your client and an insecure server (much like Cloudflare does for example).
None of the proxied applications or websites need to run on a secure HTTPS connection, since we can put Nginx in front off it and have Nginx request data from the insecure HTTP application, and then send it back over to the client on a secured HTTPS connection. This is an approach that is so simple to start with and has provided easier configuration, setup and joy to work with on multiple hosts.
Let's use the widely popular LetsEncrypt service to request a TLS certificate and install it on our Nginx instance. For local domains you could fall back to using openssl and self-sign certificates. Luckily EFF provides a very handy cli tool called certbot which we can use to easily request certificates from a CA.
An installer script for LetsEncrypt with certificate request is available at my linux-confs repo
You can install certbot with apt install certbot python-certbot-nginx. Certbot used to be a lot harder to install since for Debian 8 we'd have to build it from source but now with Debian 9 (Stretch) it's available on the apt repo and we can just install it like we would any other package from apt.
With the certbot cli now available we can request a certificate for our Nginx server:
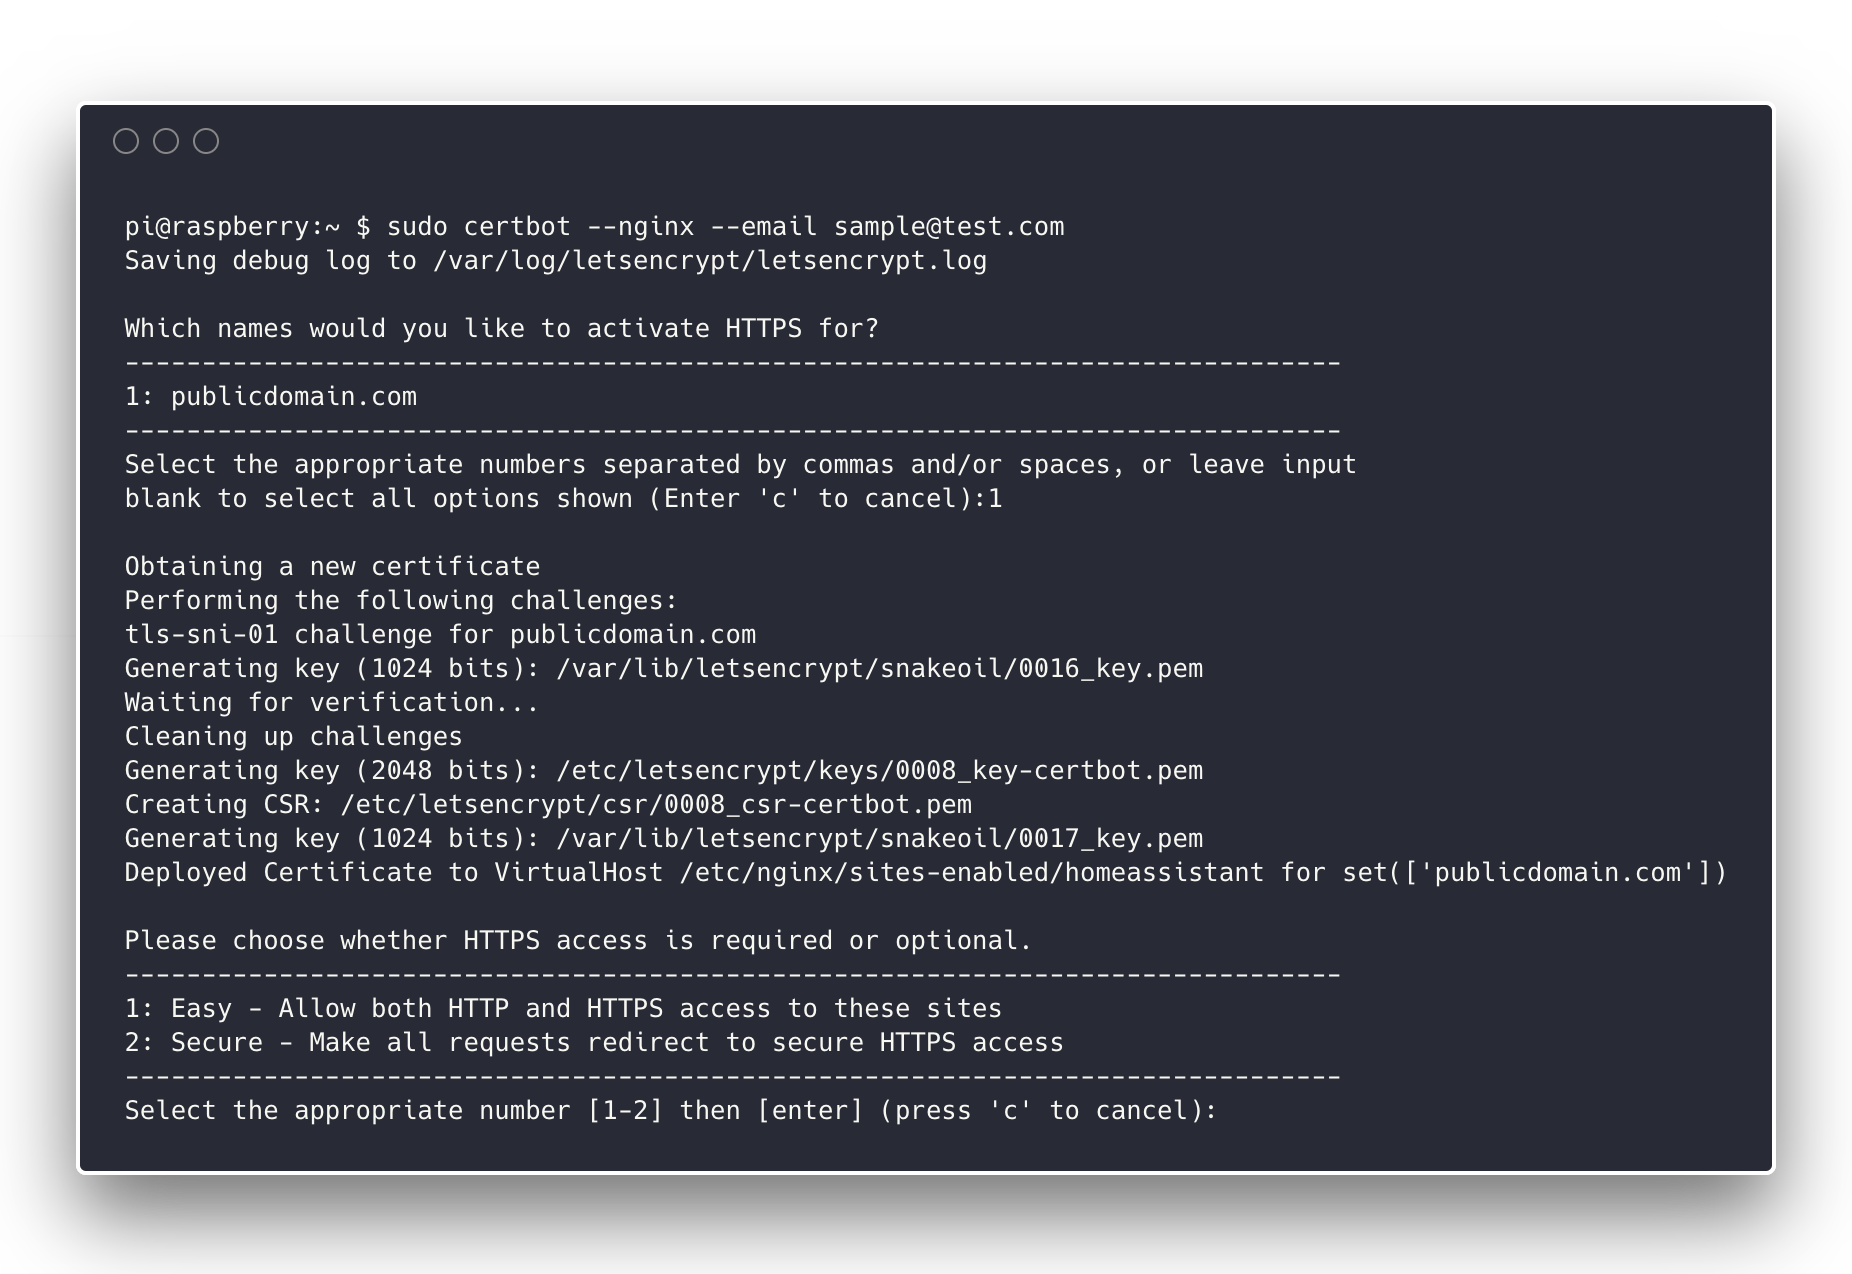
bash# Specifiy the -d <domain.com> flag if you want to skip the wizard and directly sign 1 domainsudo certbot --nginx --email "myemail@domain.com"
Certbot will read the vhosts set up in /etc/nginx/sites-available and let you choose a domain (or multiple) from the list. Note that as a final question it will ask you if you want to reroute this domain to HTTPS by default (by returning an HTTP 301 to https://publicdomain.com). This provides more safety against attacks based on non-HTTPS connections:
With this completed, your HTTPS secure host should be ready. If you check the file at /etc/nginx/sites-available/homeassistant you will see that certbot auto added the necessary Nginx directives to set up the TLS certificate and redirect to HTTPS by default. After these changes, use systemctl again to restart the nginx service.
Conclusion
Throughout this post we have…
…installed Nginx and set up (one) individual vhosts which allows us to simply add new files for each new domain or subdomain
…written a very simple configuration for proxying our application via Nginx's powerful & fast proxying engine.
…secured our vhost with certbot by generating a TLS certificate to set up a secure HTTPS connection.
…redirected all the non-encrypted network traffic happening over HTTP to a secure HTTPS connection for our host.
Additional reading
Troubleshooting
Remember that as a first good step,
sudo nginx -twill always point you in the direction of possible problems prohibiting your configuration from working.The Raspberry Pi proves to be a very cheap but powerful enough solution for setting up this Nginx node on our network. Still, being ARM based, it comes with resource limitations. It might need a bigger hash bucket size if you add more vhosts as you go along or perform more networking logic.