Since the purchase of my 3rd gen Apple TV the 1st gen I once bought was just collecting dust, I had jailbroken it before to run XBMC and Boxee but this time I couldn’t immediately think about a good use for it.
Internet told me it was possible to run OS X Tiger (10.4.8) on the ATV and I was determined to try that at first but then I found another way to use it: a local network server.
I’ve successfully set-up a linux machine with the smb protocol just three days before and that worked great too but this was a much easier option.
Step 1: Preparing the jailbreak
All file transfer is done over SSH and out of the box the Apple TV is just something which only accepts file transfer from iTunes. In order to get SSH I will need to jailbreak the Apple TV.
First I had to download the latest firmware for my Apple TV. When this was over I just used atv-usbcreator to get ready for jailbreak and create a Patchstick.
You can find it over at Github. I downloaded the Mac version but it failed each time when creating the USB. So I downloaded the windows version instead and created the USB (steps are fairly easy and can be followed here). Be sure to include SSHTools in the USB image, else it won’t work!
Step 2: Jailbreaking
With your freshly created USB Patchstick go over to your Apple TV and pull out the power supply. Insert the USB and plug the power cable back in. Hold the (-) and menu key when your Apple TV is booting up (keep holding if you don’t see anything for at least 5 seconds). The Linux logo will appear and the patching process will start. When the commands stop running and you see something like “Unplug the device” you can unplug the power supply again and remove the USB.
Let the Apple TV turn on again and you should see the Launcher menu now. If you don’t need XBMC like I do, just let this be. SSH is now installed and that’s what we wanted…
Step 3: Connecting over SSH
There are various options to communicate trough SSH but the safest, easiest way is to go over Terminal.
Open up Terminal and enter ssh frontrow@appletv.local
The above command connects to the AppleTV over the SSH protocol with username frontrow. .local uses the Bonjour protocol and works only if you’re on the same network as the AppleTV. If you’re not just enter the AppleTV’s IP address.
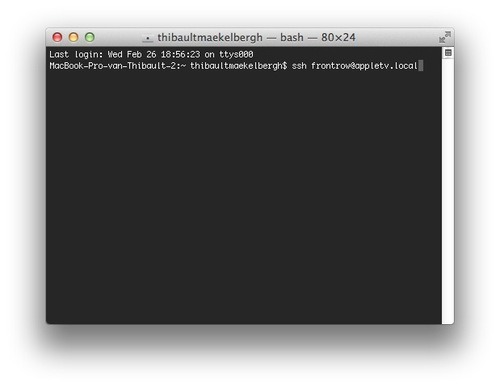
A password will be prompted for, enter frontrow (you won’t see it on screen it’s a UNIX security measure) and hit enter.
Step 4: Installing NitoTV
Now we’re connected enter the following commands:
consolecd && mkdir nitotvtmp && cd nitotvtmpwget https://nitosoft.com/nitoTVInstaller_tt.zipunzip nitoTVInstaller_tt.zip && cd "nitoTV Take Three"/sudo ./installme
This creates a temp directory for nitoTV to setup and then downloads and extracts the package from the official site. sudo./installme runs the installer from the package.
If the Apple TV doesn’t automatically reboot just enter sudo reboot now and it will, don’t close Terminal just yet!
Step 5: Installing USB support
With nitoTV installed all that is needed is to install USB support. With Terminal still open enter cd ~/Documents/ to cd to the Documents folder.
We’re now going to download Tiger OS X combo update to install the drivers with
consolewget https://supportdownload.apple.com/download.info.apple.com/Apple_Support_Area/Apple_Software_Updates/Mac_OS_X/downloads/061-3165.20070313.iU8y4/MacOSXUpdCombo10.4.9Intel.dmg
If you want you can close Terminal now, the installing is over.
Go to the Apple TV and in the NitoTV menu go to Settings > Install Software > Smart Installer, this will take a while and display a dialog with installed components.
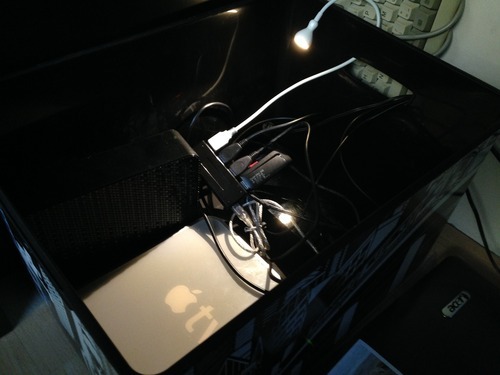
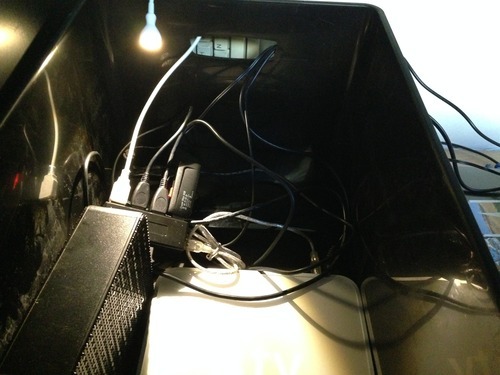
Hit restart or just disconnect and connect the power supply to reboot, connect a hard drive and we’re done, all that’s left is to access the files.
Step 6: Accessing The Files
We will need a SSH client to view the files. I’m perfectly comfortable with Terminal but some users might want a user interface to do this.
On Mac I mainly use Transmit to connect to the Apple TV. Open up Transmit and for easy setup go to the Bonjour tab where the Apple TV should be listed, double click it and enter the password and username and the files should appear

If in some case Bonjour doesn’t work or you are not able to connect over Bonjour but can use SFTP just click the SFTP tab and enter the following credentials:

Now you have full access to all the files stored on the Apple TV itself which has a 40GB HDD, but also the external HDD you might connect.
External storage devices are found on the path mnt/Scratch/Volumes.
Note that Tiger doesn’t support ExFat so go for either FAT or HFS)
Files can be drag’n dropped into the window as you’re familiar with.
Notes & Pictures
Remember the Apple TV isn’t a powerhouse machine so file transfer speed might be a little slow, I managed to get 3,4MB/sec when transferring from my MacBook to an external HDD. Also this machine get’s very very hot! Don’t store it with anything which’ll burn easy or place anything on top, keep it in an open or cooled enclosed area. Don’t leave it always on, unless you want your house to burn down.