Table of contents:
Cover Art
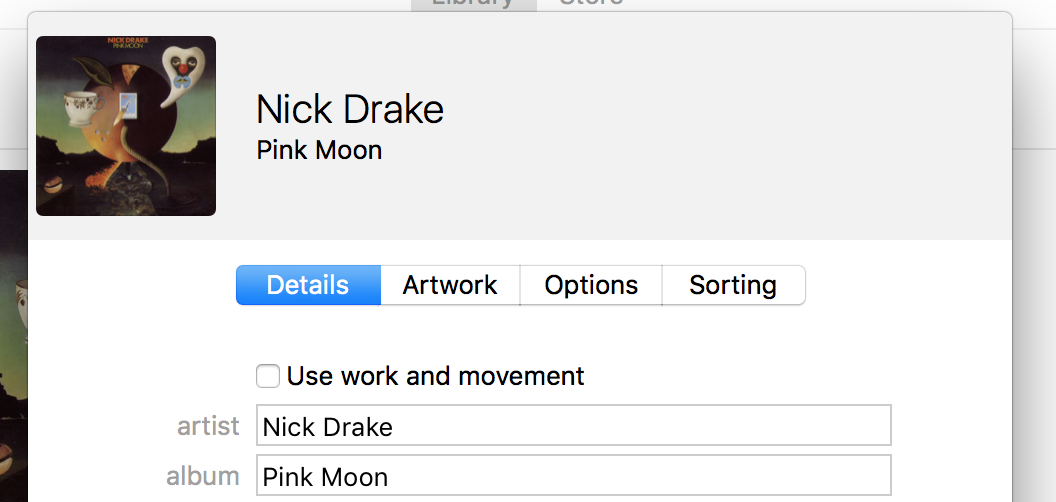
A picture says so much more than words.That’s why it is important to give every single, ep or album a cover illustration. When scrolling through covers in the Album view it becomes way easier to find a specific album. The brain remembers visually more than textually. You can imagine I can find a specific album in a list of 20 by the same artist way quicker by looking at the cover than reading the album title.
The way I work for EPs or albums that don’t have cover art is as follows: I look up the album art on the internet (most of the time this is via Discogs, or Soundcloud. Google Images might work sometimes) and then open the Info dialog on one or multiple tracks. Then just grab the image in your web browser en drag it over to Thumbnail displayed in the upper left.
Here is a javascript bookmarklet for grabbing cover art from SoundCloud
iTunes Columns
When in the songs view, iTunes formats the library layout to include some pretty useless column fields. How many times I played a song or how much I’ve rated a song (I never do this) is something I almost never need to know.
I think the ideal column field layout is as follows:
Time | Title | Artist | Album | Album Artist | Genre | Year | Bitrate
This gives you practically all the useful info you need, when you need to examine a track or search for one. Bitrate makes it easy to take a look at the lower bitrate items you added, and might want to replace.(The BPM field might also be interesting to those who are DJ’s or producers, but you’ll have to manually provide BPM’s in the Info window)
Understanding & using bitrates
If you’re not familiar with bitrates, the Wikipedia entry for it is something you should read.In general a bitrate resembles the amount of data a track streams in seconds (expressed in kbps). Bitrates and codecs are somewhat more technical, but the basics of it are fairly easy.
A higher bitrate is better than a lower bitrate (more data is being sent), but higher bitrate means higher file size. Bitrates are also dependent to codecs and can be two formats, CBR or VBR (Constant, e.g the track constantly transfers 320 kbps VS. Variable, e.g the data transfer changes while playing the track from 320 to lower and than back up). In general the codec most people are familiar with is MP3. MP3 is a lossy codec, meaning it loses some quality but is smaller in file size.MP3 is a good standard to get audio in but try to always get a track with a bitrate of 256 or 320 kbps. Lower bitrates might sound less crisp.
iTunes’ and iTunes Store’s default format is an AAC codec called .m4aI personally prefer m4a over mp3, because it is also a lossy format but a 256 AAC track maintains more quality than a 256 MP3 track.
The M4A container has also become supported on most major recent OS distributions, media players and editing software. I see no excuse in not using AAC (in an M4A container) over MP3.
TL;DR: Pick whatever codec you prefer but try to obtain a quality of at least 256 kbps.
Equalizing
Equalizing a track is something I rarely do.Though iTunes provides a general and track specific equalizer, most tracks don’t need them. Producers already think stuff like bass, mid and high tones trough when they are working on a track, so they are practically equalizing it so you don’t have to.
If you still want to equalize a track or tracks, always use manual equalization and never use the built in presets.While the Dance preset might work for your bass-filled techno track, it may sound awful for the techno track with lots of hi-hats. Keep that in mind.And as stated by Lifehacker and other music enthusiasts, always, always, always equalize down.
iTunes Info Windows
All these tips might get you thinking “Hey this is really useful stuff” but most of them won’t work if you don’t fill in, or know how to work the iTunes Info field.When I obtain a new track, the first thing I do is open the info dialog and fill the info in accordingly. Start by opening the Info window by right clicking on a track (or multiple if you’re working on an EP or album), or pressing cmd + i on a Mac.
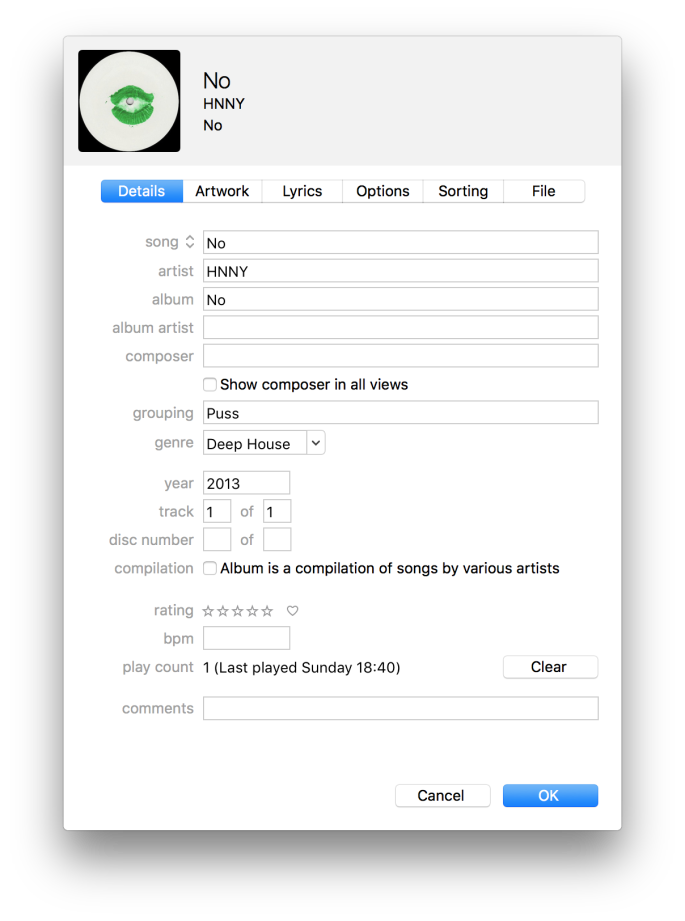
The default Details tab shows a bunch of options, but you don’t have to fill them all in. I’ve made a selection of the most useful ones which will provide clear structure and optimize searching for an item in your library.
It should be clear the song and artist fields are something you should always fill in. If you’re working on editing a compilation album which consists of multiple tracks by multiple artists a good rule to maintain is to fill in the specific artist for each track, and Various Artists in the album artist field. This way they will show up as one album in iTunes’ album view but still provide individual artist info per track. Also be sure to tick the box for compilation.
It goes without saying that maintaining a good naming schema is best practice. Having an artist field say STWO in one album and stwo in another is just counter productive when your talking about the same artist.
When it comes to the album field, I tend to always copy the name of the album as it is released by the artist (look this up on iTunes Store, Beatport or Spotify). EP, Single or Remixes should always be formatted as follows: Album Title - Type.For example Leave Me Alone by Kaytranada should be formatted as Leave Me Alone - Single When you get the routine of doing this it will provide clearer and vaster structure for your library.
Grouping is something which for me is an alias to the label field.iTunes doesn’t provide a label field so this is where I like to fill this in. It makes it easy to find releases by a specific label in iTunes’ tracks view. This also comes in handy for smart playlists
Provide good but not too detailed info for genres, and always provide a genre to a track. Some people may like to list subgenres like Footwork, Leftfield and others here but I like to give it a more general name. For example Footwork and Leftfield both go under the Electronic genre for me.
Always provide a year as it is easy to find a specific release by a label if you do so, or ever need to look that up.
Fill in track numbers if you want to, and always fill in Disc numbers accordingly if you’re working on a multiple disc album. This way an album won’t be split up into two separate items in iTunes’ album view.
Smart playlists
I never really played around with these until a few months back when a friend told me he was tidying his library and was using smart playlists to help him. Then it actually hit me that these were great for keeping a library in sync with this styleguide. The rules provided are really extensive, for example these are my current smart playlists:
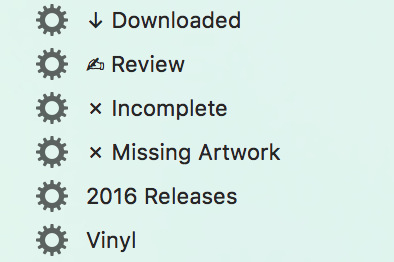
iTunes Match users can quickly create a Downloaded playlist to see which songs are matched, but still stored on HDD.
Review for everything that might need genre changing.
Incomplete for songs or albums lacking a genre, year, album title…
Missing artwork for items without cover art.
Yearly overviews, like everything released in 2016
Everything you physically have that matches vinyl in the comments section of the Info Window.
Rules are really simple to create and requires just the skill to read the clear operator-like language:

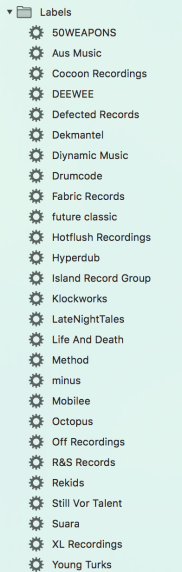
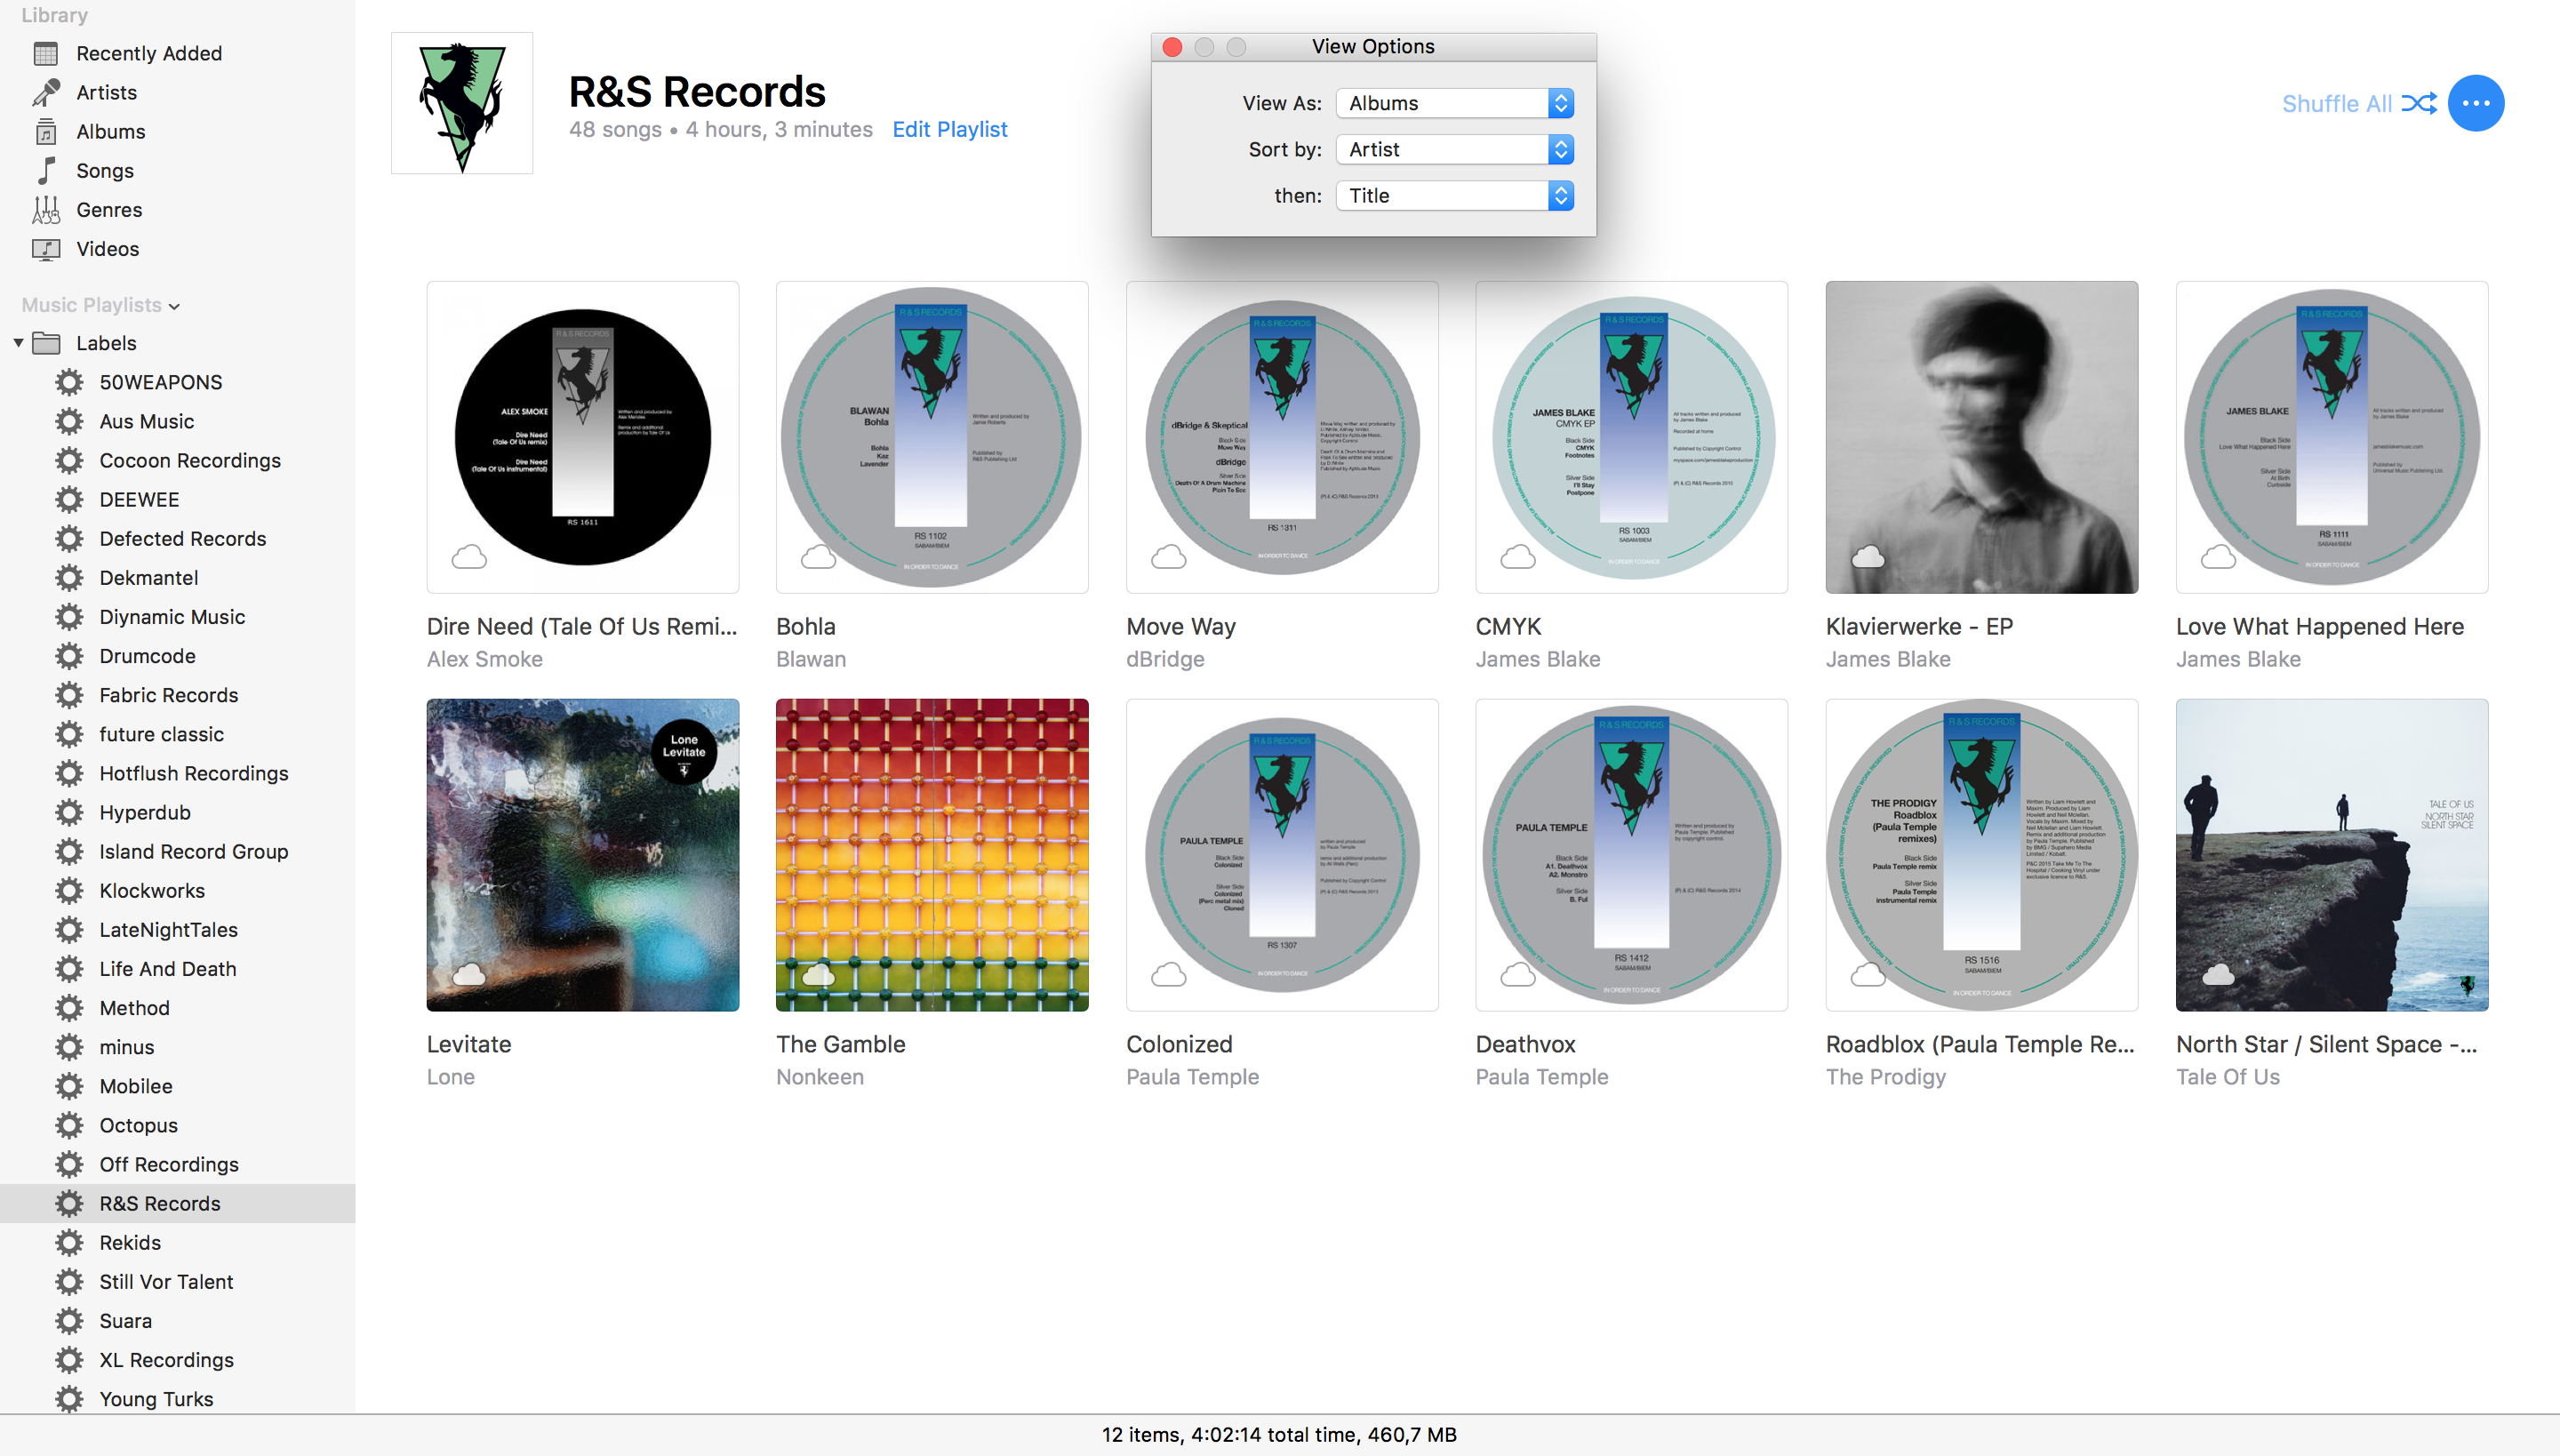
But for me the real added functionality here lies in something critical which I never got why Apple didn't include this in iTunes: Viewing by grouping (or label)
You can add the grouping field in the Info Window but nothing is done with out until you explicitly tell iTunes to display groupings in the Songs View. This makes grouping basically a useless item to add if you wouldn't use smart playlists.
By using a smart playlist for a certain named grouping you can quickly get an overview of your labels:
Clicking a playlist will default show you the Playlist View but, it looks way nicer + you get some overview when, you put the View As option to Album:
Conclusion
These tips will probably require some work transitioning to from your current library but, trust me, once you get all the rules in order having a well maintained library will be a bliss and will require zero extra work.
Thanks for reading all the way trough, if you have anything to say about this post be sure to put it in the comments or give me a shout on Twitter.